|
Home Page Table of Contents Back to Chapter XXII .pdf
APPENDIX G
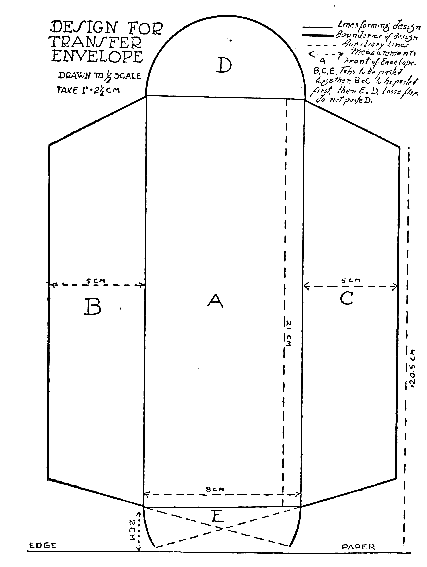
The accompanying diagram indicates a good design for making transfer envelopes out of any ordinary sheet of typewriter paper. For more specific directions: measure off from the center (or the approximate center) of the bottom of the sheet, a distance of 4 cm and of 9 cm in each direction, and at the four points thus marked, draw lines at right angles with the bottom of the sheet. On the two middle lines, mark off a distance of 2 cm from the bottom of the sheet, and connect the two points thus marked off; mark off on each of these lines again 21 cm from these marks, and connect again. Each of these connecting lines should be just 8 cm long. Mark the middle of each of these transverse lines (4 cm from either end), and draw a semi-circle with that as center and a 4 cm radius, above the top line and below the bottom line, most of the bottom semi-circle being off the paper altogether. The top semi-circle is the part of the diagram labelled D, and the part of the bottom semi-circle on the paper is the part labelled E in the diagram. Continue each diagonal of part E to the outside vertical lines; also connect the two ends of the top semi-circle to points on the respective nearest outside vertical lines 20.5 cm from the bottom of the sheet, thus forming the two trapezoidal tabs labelled in the diagram B and C. Cut out the entire design formed of an interior oblong (A in the diagram), 8 x 21 cm, which is to form the front of the envelope, and four tabs, namely, the two trapezoids B and C, each 5 cm wide, the top semi-circle D, and the bottom tab E. After it is all cut out, fold B and C upward along the edges of the oblong A, and paste the edges firmly together; the fold the tab E upward along the bottom edge of the oblong A, and paste this tab firmly onto the bottoms of B and C, but taking care that none of it should be pasted to the oblong piece below. Afterwards D may be folded in to form the envelope flap, but should not be pasted down at all. It is at this end that transfers are to be put in the envelope, and it would hardly do to seal it up. Of course, one may well copy the diagram which is drawn to half scale, copying only the heavy lines representing the border to be cut out, and then fold in and paste according to direction. In any event, it is entirely unnecessary to copy any of the auxiliary dotted lines. All measurements are properly indicated on the diagram. The drawing actually to be made preliminary to making the envelope should be done in pencil. In the finished envelope all the pencil marks will be in the inside of the envelope and, therefore, will not show; with the exception of the diameter of semi-circle D, which may then, if desired, be erased. Since an active transfer collector may at any time find transfers from some new system, or have to "divide" and envelope which has become too full, it is best for him to have plenty of envelopes on hand, so he can make a number at once. This may be done by making the diagram on one sheet of typewriter paper, and placing other sheets directly below it in a perfectly even pile, when the same diagram can be cut on all sheets at once. Only the folding and pasting need be done separately for each envelope. We have thus cut out the design for as many as fifteen envelopes at once. Care should, however, be taken that the sheets do not slip during the cutting process. When folding, the creasing should be done with a ruler or some other such object rather than with the hand; simply pressing the edges together after pasting. In either case, especially the latter, the use of something other than the hand avoids smearing the envelope with finger prints. We may note that envelopes thus made may also be used for letters, and are of very convenient size for keeping documents in. Where it is required to seal the envelope, all that is need is to paste down flap D after the desired material has been inserted.
Home Contents Back to Chapter XXII
|
